♥ We always put a little love in our art...
but this time, we're putin' a lot of love in our heARTs ♥!
To make these 3D hearts from the heART... we are going to be papier mache'ing.
I ♥ to papier mache - it's easy, inexpensive, a little bit messy, a lot of FUN... & eco-friendly, too!
All you will need is newspaper, tape, & a small piece of corrugated (approx. 4" x 4") for the form.
And, equal parts flour & water, and a pile of newspaper strips for papier mache'ing.
First, take a piece of newspaper and 'crumble' it into a small circle, then push and shape it,
creating the heart with your fingers and hands (your most valuable tools!).
This will be the beginning of your form.
Take the tape and wrap around your form, securing the heart shape.
Take another piece of newspaper and wrap that around your heart,
again shaping it with your fingers and hands. Add a little more tape to secure it.
Add another piece, and repeat.
Continue adding pieces of newspaper, one at a time, until you have your desired size. (I used 4!)
Then cover most of the it with tape, to really secure your heart shape.
It's time to make the papier mache paste. You may want to cover your workspace with a plastic covering and put on a smock, this is going to be messy!
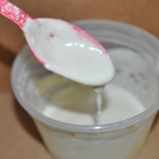
Slowly add the flour into the warm water (warm, only because it feels better than cold!) – mixing well with a spoon. Make sure it's not too runny and not too lumpy. You want your paste to be a good, smooth consistency.
Slowly add the flour into the warm water (warm, only because it feels better than cold!) – mixing well with a spoon. Make sure it's not too runny and not too lumpy. You want your paste to be a good, smooth consistency.
Now it's time to papier mache! Taking one strip of newspaper at a time, dip your finger into the papier mache paste and spread it on to the strip.
Put the first strip on to the heart, starting wherever you want, smoothing down the edges. Continue adding strips of newspaper covered with the paste, one at a time, overlapping them as you go along. Make sure you smooth the strips down on all edges.
Cover the entire heart with newspaper strips. Let dry for at least 24 hours.
Once it is completely dry, hot glue (oops, forgot to mention the hot glue before!) the heart on to the corrugated square. If you missed some spots, or want to add a little to the form for a better heart shape, you can easily do that at this point.
Cover the entire base and the heart (again!) with newspaper strips and paper mache paste. Remember to get in to all the nooks and crannies. Also remember to cover the edge of the corrugated to seal it. Let dry.
Once it is dry, it is time to paint and decorate it. Acrylic paints work best. You can sponge paint, splatter paint, add puffy paints for more dimension. It is up to you, whatever you want -– remember, you're the artist, you decide!
My first graders had a lot of fun with Puffy Paints -and- Plaid's Extreme Glitter paint, FUN!
hearts from the heART... so cute, so sweet, and Enviro-Friendly, too!
i ♥ them!
want more ARTrageous Recyclables...
go to ~> http://yougottahaveart.org/
go to ~> http://yougottahaveart.org/


No comments:
Post a Comment